
| STORE
HOURS 9 TO 6 CDT GMT minus 5 hours Monday thru Friday Do not call on Sat. Sun. please |

We offer a full line of piano tuning tools, tuning levers, and Regulating tools.
Tuning meters and tuning forks of several choices on hand.
![]()
This is where I expect to get into trouble with a good number of piano tuners. They will resent me helping you do anything to keep your piano in tune, so, please, will you be my friend :-)
On the other hand, you need to know that you will not be able to tune your piano to perfection. All we are talking about here is something between nothing and perfection. We will help you get the twangs out until the tuner comes later. This page WILL NOT eliminate the need for regular tunings.
![]()
_____________________
 When
you do not buy the right tools to move tuning pins, whether only one or to do
a whole tuning, you will almost always destroy tuning pins. This is because the
lever used to turn tuning pins has a unique design to match the also unique design
of the top of the tuning pin. This is not hype to sell piano tools. I do not do
that. It is a fact, and if you cheat, you will buy the lever and an attachment
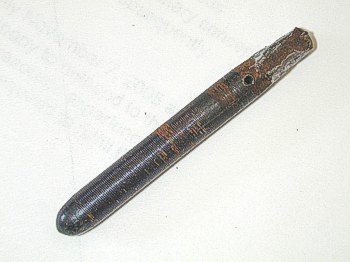
to remove the damaged pin in the end. At the right you can see what happened to
a tuning pin turned by an improvised tool. The most common trick is to use the
reverse end of a quarter inch drive socket. This trick makes me lots of good cash.
When
you do not buy the right tools to move tuning pins, whether only one or to do
a whole tuning, you will almost always destroy tuning pins. This is because the
lever used to turn tuning pins has a unique design to match the also unique design
of the top of the tuning pin. This is not hype to sell piano tools. I do not do
that. It is a fact, and if you cheat, you will buy the lever and an attachment
to remove the damaged pin in the end. At the right you can see what happened to
a tuning pin turned by an improvised tool. The most common trick is to use the
reverse end of a quarter inch drive socket. This trick makes me lots of good cash.
Find a tuning lever on this page.
 Another
problem is that some tuning pins are smaller than normal, and if you buy the Economy
Tuning Lever it may not fit down tight on a smaller pin. To avoid this, you may
want to substitute our Craftsman Tuning Lever in place of the Economy Lever so
that you can buy a small tip for the lever to use on smaller pins. The photo on
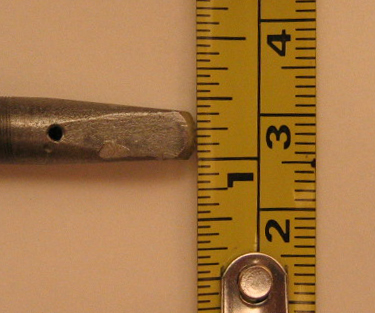
the left shows a tuning pin damaged by a lever not fitting perfectly, or it may
be that the person trying to tune did not seat the lever all the way down tight
on the pin.
Another
problem is that some tuning pins are smaller than normal, and if you buy the Economy
Tuning Lever it may not fit down tight on a smaller pin. To avoid this, you may
want to substitute our Craftsman Tuning Lever in place of the Economy Lever so
that you can buy a small tip for the lever to use on smaller pins. The photo on
the left shows a tuning pin damaged by a lever not fitting perfectly, or it may
be that the person trying to tune did not seat the lever all the way down tight
on the pin.
_____________________
You have no choice in this section-- This time, you HAVE to buy the tools I suggest. You can get them from my Online Catalogue at the end of the book, or you can ask your tuner to order them for you. Most tuners will be very disinterested in helping you.
You will need the "Tool Kit for gifted do-it-yourselfers" in the catalogue. If you want to use the cassette tapes, you will have to order the "Supplemental tool kit." These items are not cheap, but they will be of use to you in many repair requirements.
You may want to order the "KORG T-12 Tuning Meter." It will make the tuning process much easier, and it will be useful for many years for tuning any instrument. The tuning fork set is interesting, but I would choose it last. The problem with tuning forks is that it is hard to thump it, hold it, and then adjust tne tuning pin. On the other hand, tuning forks don't need batteries, and they can go anywhere with you.
![]()
![]()
The simplest level of tuning is to bring each wire in a note into the same exact frequency of vibration. When you hit a key on the piano, the hammer hits the wire or wires in that note, and they vibrate.
Most notes have three wires. A number in the bass area have two wires per note, and about 15 in the lowest bass have only one wire. In the two and three wire notes, if the frequency of each wire in the note is not the same, you get a beat set up between the wires. This disagreement between the wires can be so bad that all you hear is a horrid "twang." Not a technical word, but it fits well.
![]()
The second tuning objective, and a little harder, is to get agreement in all octaves. When you play "C" and the "C" below it at the same time, there should be no beats. All octave multiples of any key should be in agreement and beatless. This is possible because any octave note below another octave note beats at exactly half the beats per second. They are in precise fellowship physically. A beating octave, where the two notes in the octave are precisely in fellowship, will set up a twang or beating sound just like the wires in a single note.
![]()
Every key on the piano has a relationship with every other key on the piano. This is spelled out in the theory of tuning. This can be tested by listening for beats which MUST be there-- beats between thirds, fifths, sixths, seventeenths, and so on. This is very difficult to master, and you must leave this to your tuner.
![]()
Every piano in the world has a point of reference with pianos or instruments elsewhere. This is regulated by the designation A-440. "A" above middle "C" must be beating at exactly 440 beats per second. (Middle "C" is actually beating at 261.626 beats per second, but a "Middle C" tuning fork will be calibrated double that at 523 beats because it is easier to use.) If this standard, and the other three levels of tuning, are followed, a piano can generally respond to any music situation found in the world.
Exceptions exist only where orchestras call for A-444 or some other standard. The tuner needs to know the requirements before he tunes the piano.
For our purposes here, you will be dealing with Level One only. Level Two will be considered for any who wish to go a little further.
![]()
A "twang" in this section is a disagreement in frequency between two or more wires. The greater the disagreement, the harsher the twang. Correcting these twangs is the most reasonable thing to expect from yourself. Most people can do this if they do what I suggest.
Step One: In each twang, there is usually one main culprit doing the damage. To find that wire, use the mutes and the tuning lever. Where there are three wires per note, slip the rubber mute between one outside wire in a note and the wire next to it in the next note. Hit the key. Did the twang go away? Yes? Well, the wire you want to adjust is the one the mute is silencing.
If the twang did not go away, move the mute to the outside wire on the opposite side of the three wires, and mute out that wire. The twang should go away. Once you are sure which wire is causing the twang, go to the next step.
Step Two: Move the mute to the opposite side of the note muting out the other outside wire which did not make the twang. Never try to tune more than two wires at once. Now, hit the note with the twang.
Put the tuning lever on the pin which is attached to the wire that caused the twang. Seat the tuning lever all the way on the pin. While you hit the key in a regular beat, slowly "pull the wire up" or tighten the tuning pin slightly. You will notice that the twang goes away and then returns. This is because the note will twang when a wire is sharp or flat-- either above the other wire or below it.
If the beat speeds up as you begin to tighten the pin, it is because the offending wire is sharp for some reason. Stop, and drop the wire, or loosen the pin so that you hear the beat disappear and return. Then go on.
Pull the wire up until the beat goes away and starts to return. The wire is now sharp. Now, put some pressure on the tuning lever to push the wire back down (loosen the tuning pin) but don't actually move the pin. Hit the key rather hard. This will "bang" the wire down in intervals since the tuning pin already has the pressure of your pushing on the pin to drop the wire. Do this until the twang gradually goes away.
How do you know the twang went away? Listen for the beats between the wires. You will hear a waaaooo waaaooo. It will get faster or slower as you raise or lower the wire you are moving. The farther you get from the two wires beating in the exact same frequency, the faster the beat, and the worse the twang. Your objective is to get both wires beating at exactly the same frequency. This is the case when you cannot hear even a slow beat.
You will be tempted to say that you cannot hear the beats. You will have to listen carefully, moving the lever up and down slowly. You can hear them if you try for a while. Hearing these beats has absolutely nothing to do with "an ear for music." It is very mechanical. Most musical illiterates and hillbillies can hear this just as well as anyone else, but it does take concentration to get it.
To be sure you don't get too tight with a wire and break it, pluck the two wires you are working with using your finger nail or a small screw driver. The one causing the twang should at first sound slightly flatter than the center wire. If it gets confusing, pluck the offending wire. If it is clearly sharp, start over. "Drop" (loosen) the offending wire slowly until it is clearly flat to the center wire when you pluck it.
What if you mute out both outside wires, one at a time, and the twang is still there both ways? That means the center wire is the offender. Mute out either one of the outside wires, and work on the center wire in the note to get it in agreement with the outside one. To get the best results, the note in question should be worked over by the instruction in "Tuning an Octave" below.
Step Three: When you are done getting two wires to agree, and to get perfection, tune the third wire to the others by muting on the opposite side and tuning the third wire to the middle one.
![]()
With two wire notes there is not a two wire majority to use to find the offending third wire. How do we find the bad wire? First try plucking the two wires with a small screw driver or a guitar pick. You will have to lift the damper off of the wires somehow.
As you pluck the two wires can you tell which one is the lower tone? If so, that is the bad wire. "Lift it" (raise its pitch) as above. You won't need the mutes of course. Just bring the offending wire up to match the other wire until there is a clear tone.
If you cannot tell which is the offending wire, play the note above it in the octave, "C" with "C", "A" with "A", etc. Mute out one wire in the two wire note, then the other as you play the octave. It is very hard for a beginner to tell which of the two wires to favor, so just pick one and call it the offender. It's kind of like they pick offenders in Communist countries. Use the same technique with your tuning lever as in a single note, and eliminate the beats in the octave.
![]()
The beats in an octave are harder to hear, and you may have to mute out both outside wires in the upper note to hear the beats well. If necessary, use all of the four mutes, provided in the tool kit, between the wires to get enough mutes for this step. Mute out all but one wire in each note in the octave chord you are working on.
Play up and down the keyboard by octaves. If most of them are acceptable with a fes bad ones, this method can help. If all of them are twanging away, forget it. Call a tuner.
Hit one of the bad octaves. Since you cannot tell which of the notes is the offender, assume that the lower one is it. You might also check by hitting the octave above and below the one you are working on. Logic may tell you right away that a particular note is the offender.
Use the tuning lever on the tuning pin of the wire in the note you feel is off. Hit the octave over and over while you slowly pull up on the wire. After you hear the beats slow down, go away , and then come back, put tension back downward on the tuning pin as above, and start "banging" the wire down by hitting the octave hard.
Once you have the lower wire, or offending wire, in the octave beatless, raise the second (and third) wire in that individual note to be beatless with the other, as in "Touching up Twangs" above. You have eliminated twangs at this point, but I must stress again, you have NOT tuned your piano. Your work in one octave may not be in a right relationship with the other 86 keys of the piano. Call your tuner for that.
This is an acceptable but approximate solution to a tuning problem, but it sure will take the twangs out. To get clear octaves, read on.
If, after reading the instructions for "Touoching up Twangs," you are rather confused, by all means do not go on to meddle with the octaves. However; if you got satisfying results with the above, you can probably handle the following.
![]()
This is a more tricky tuning attempt. You are going to try to tune ALL the pins and get the notes right with each other. Each person who tries this will get varying results. Just do your best, and don't tell you tuner you got into the piano.
In fact, you might want to settle for just getting the octaves right with each other.
First, play up and down the piano by octaves. Listen to see if there are twangs. If so, check the individual keys in the octave that is twanging or beating. If one note in the octave is clear, and the other is twanging, chances are, your problem is an individual twanger. Go back and see if you can correct it by the previous method.
If both notes in an octave sound twangy, the octave is out. Play the octave above where you are. Is it clear? Yes? Then you can assume that the note at the bottom of your original octave is the twanger. See illustration.
You may need to shift this test up and down the piano until you are sure which note offends. If your piano has not been tuned for a long time, the problem may be that the middle has dropped badly, and the bass in holding better. In this case, you will have to do this with every note through the bass. You could end up inadvertently dropping the whole piano in tension. Why not just call your tuner?
Once you have isolated the offender, you need to read the last topic in the previous section on individual twanging notes called, "Tuning an octave." Pick a wire in F1, and mute the others out. Bring the wire you chose into a beatless relationship with F2-- or until the twang is gone. In this case, F2 is the standard. I hope you read all of the above section on individual twangs and worked on a couple of twangs there. Check out the illustration again also. The principles of using the tuning lever and mutes here are the same as there, only you have to work with octaves.
Once F1 and F2 are right, you can use F1 to tune the octave below it. F1 becomes the standard for the next octave lower. You can work your way up and down the whole piano the same way. For this reason, you must be very careful to get F1 and F2 right since any error in them will be repeated throughout the whole piano. Your choice of an octave as a foundation is pretty arbitrary, but if you checked three of four octaves and found them in basic agreement, you have moved back to be "in tune" rather than "out of tune."
After F is right, you can go on to do the same with other keys. Be sure to start in the middle of the keyboard. It is important to understand that you are only getting out the twangs in the octaves. You are NOT getting F, E, and A in a right relationship with each other. You must not deceive yourself into thinking you have "tuned" your whole piano. Your tuner has to do that. It is not possible to cobble a complete tuning.
An alternative is possible, and you can get much closer in all octaves if you are willing to invest in the KORG tuning meter from my Online Catalogue. In that case, turn to Appendix One, and graduate. I was not going to include this offer at first, but I decided that those who want to try should be given the chance. Also, I went to the INTERNET and WEB with the book, and there are those in countires around the world who cannot even call a tuner. Appendix One may help them actually tune their own piano for years and stay rather close to true pitch.
If this section is too confusing to give you confidence in trying to do it, let your uncle Harry read it. Maybe he can figure it out. If not, don't venture into it blindly. You could just break wires. I love you anyway, and so does your tuner. Save your bucks, and call him for an appointment.
![]()
![]()
![]()
![]()