
| STORE
HOURS 9 TO 6 CDT GMT minus 5 hours Monday thru Friday Do not call on Sat. Sun. please |
The sound board is a five eighths inch thick wooden board in the back of the piano. On the back of it, it has one inch ribs which stabilize it by running against the grain of the sound board. A sound board is made one of two ways. The traditional sound board is made of several five eighths thick boards which are glued side by side across the whole inside of the piano. It is the best sounding board, but with age, it can crack. More recently, sound boards have been made of laminated wood, or glorified plywood. They never crack, but they are slightly dead or muffled. Pay your money and take your chances.
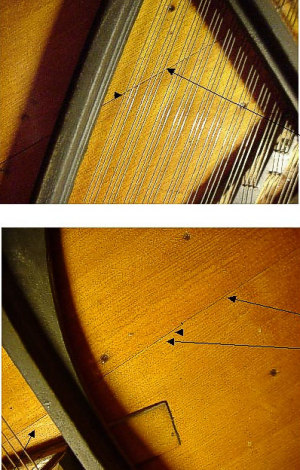
So, what's the problem? When a piano develops cracks from old age, the cracks can cause buzzes. Also, the crack is much bigger than it would appear. When a crack develops, the spruce of the sound board warps and pulls away from the cross ribs. The effect is to widen the crack as far as acoustics are concerned. The illustrations will help you see what is happening. While we are here, let's talk about the graphics at the left. You are looking at the front of the sound board area and the lower end of the treble bridge in the lower left an upright from the turn of the century from Leipzig. The lower graphic shows a crack in the sound board at an angle to the upper left. The end of the bridge mounting board is also hanging in space. This prevents all the sound from transferring from the lowest strings shown into the sound board. The sound will have to travel up the bridge and find a way to the sound board by traveling far. This mutes the sound greatly at times. The crack and the bridge mounting board separation call for an examination of the bridge to see if the main bridge is also separating. If so, go to Chapter Sever, Section 6-- Bridge Repair for instructions. The crack here is not badly advanced, but it should be done at once. I also want you to see the severe deterioration of the varnish on the sound board. This sound board was over varnished I think, for the effect looks very think. Try to keep from adding so much varnish when refinishing a sound board. The weight is a real issue, and the cracking could slightly slow down the board. The object of repairing the sound board is to return the warped sound board to be tight against the rib again. All you need to buy is a box of 100 No. 10, inch and a quarter wood screws. I suggest Philips head. Also, if you don't have one, get a counter sinking bit for wood which will fit your drill motor. If you are working on an upright, you will have to get it well away from the wall so that you can work behind it. If you have a grand, you will have to work under the thing. Extra light is essential in both cases. Tools: Sturdy Philips Screw driver. Slow speed electric screw driver or drill with Philips bit. One drill bit the size of the shank of the screws you bought (see below). Counter sinking bit for wood. First, clean the whole area behind the upright. The grand will be clean already. Second, Determine which drill bit to use. The size of the bit must be exactly the same as the diameter of the screw shank. You are NOT going to drill a guide hole for the threads. Third, Drill two holes on every rib-- One on either side of the crack wherever the rib crosses a crack. Drill them about a half inch from the crack. DO NOT DRILL INTO THE SOUND BOARD. DRILL ONLY THROUGH THE RIB. STOP SHORT OF GOING INTO THE SOUND BOARD. Are you getting the point? You will bungle the whole job if you drill into the sound board. This hole you are drilling is to let the screw turn freely in the rib as it bites into the sound board. If you are unsure of yourself, go invest in one of those drill bits which have a stop on it. Set the stop so that the exposed part of the drill is only as long as the rib is deep. The spruce sound board is five eighths of an inch thick, and it is not overly hard wood. Any error could put you all the way through the board. If the crack has opened and warped a lot, drill four holes in the rib-- One on each side of the crack (total- four at each point where a rib crosses a crack). Fourth, Using the counter sinking bit, recess the tops of the holes just enough for the screw heads to be flush with the rib. This is neater work, and it is more secure. Fifth, Put a screw into every hole. Take a look at your work, and see if you have missed any points that need doing. You will have to let some points go undrilled because they will be behind the wood frame of the piano. Don't worry about this. Now, run the screws in with the electric drill motor and the Philips bit. The best drill motor is a battery operated one which runs slow. If you cannot control it, use the hand held screw driver for the whole process. You must not over tighten, or you will strip out the screw in the sound board. Leave the screw to be tightened the last couple of turns with the hand held screw driver so you have control. As you can see in The illustration, the tip of the screw may just come through the other side of the sound board. This is good since the threads of the screw are getting a full bite in the wood this way. In the grand piano, you may not like the tips of the screws showing when you look into the piano. Sorry, but if you use a one inch screw, you will not get a good bite in the wood. Better to have the points showing than the loss of volume or a buzz, right? If you had to put two holes on each side of a bad crack, tighten the outside holes first, then tighten the inside holes. This will bring the board up in stages and prevent stripping out the screws. Don't cover the screws for cosmetic reasons as restoration shops do. You may want to snug the screws in a few years. You are done. It may not be real pretty, but your piano's sound board is now good for another fifty years. You can run some Elmer's glue into all of the cracks, but it is not necessary. I usually don't bother. There are toggle bolts made just for this repair, and you can get them from your tuner. But, they add too much weight to the sound board, and several cracks could cost quite a lot. I don't like them, and I won't tell you how to use them. Last thought: If the sound board was severely broken up, and yet you got it all back together, you should do two more things.
Filling Cracks in Sound Boards Repairing the sound board from the back is essential, and filling the crack from above will not be enough alone to secure the sound board and stop the buzzing. Once the process above is complete, you may want to fill the cracks on the top side of the board for cosmetic purposes. To accomplish this you must be doing a complete restoration and removing the harp for restringing. Once the harp is removed, you must deepen the grooves where the cracks are. Two "V" shaped tools are available, and either will work. The one with tools on each end and a handle in the middle has the most options for work. See this catalog page for sound board repair items. The groove made by the tool is "V" shaped. This groove will then receive a spruce shim which is shaped the same way. Elmer's Carpenter's Glue must be used, and the spruce shim is tapped into the "V" groove and allowed to dry. The chisel end of the tool is then used to trim the excess of the spruce shim down level with the sound board You must avoid getting into the sound board Some very modest sanding is in order as a last step, and the sound board should then be lightly sanded and a coat of varnish or lacquer added.
Restoring the Crown and Down Bearing of a Sound Board CAVEAT
EMPTOR: This is strictly an act of desperation. If you use this technique, you
must take 100% responsibility for the results. I have never done this. This information
is gleaned from people who have DETERMINE IF YOU NEED TO CORRECT THE CROWN Down bearing is the force of the strings pushing downward on the bridge top. Crown is the curvature of the sound board upward across the board in all directions. The crown should be 3/8 to 7/8 inch if you were to use a straight edge underneath the sound board, holding the ends of the straight edge at opposite sides of the edge of the sound board. This is impossible to do, so the bearing is measured from above. You must first use a straight edge or a Bearing Gauge to determine if you have any crown, or down bearing. The strings must technically go uphill from both the top and bottom edge to the bridges. The easy bridge to check is the bass bridge. It is out in the open. Any amount of bearing is usually satisfactory, but no bearing, or worse, negative bearing, means the strings are trying to ride up away from the bridge and simply vibrate in the air instead of transferring the sound into the sound board. Use the Bearing Gauge, placing it on the top of the bridge along a string. The outer ends of the gauge should have a slight open space between them and the string.
ASSUMING YOU HAVE NO BEARING This gets weird. You must have let ALL the tension off the piano harp. This means this technique is ONLY to be tried on pianos under restoration of some sort. You may leave the harp, the metal plate, in the piano, but the tension must be taken off the harp completely. This is done by letting off the tension of all the strings by using the tuning pins. Do this in at least three steps, letting the tension off the whole scale in stages. The ideal is to have the strings out of the piano. This instruction is for grand pianos, but it can be adapted to uprights if you raise the upright off the floor on heavy saw horses. This is dangerous though without the right equipment to raise an upright into the air. REMOVE THE ACTION FROM THE GRAND PIANO. REMOVE THE DAMPERS AND THE DAMPER ACTION INSIDE THE PIANO. If you do not do this, these parts could be damaged by the humidity added later to bend the sound board. See Chapter Five for instructions to remove the action. REMOVE THE DESK, LYRE WITH THE PEDALS, AND ALL REMOVABLE PARTS OF THE CABINET. REMOVE THE TOP, OR LID, OF THE PIANO, AND THE LID PROP. You want to be down to the cabinet, harp, and sound board only. DO NOT REMOVE THE HARP. In fact, tighten the large screws around the edge of the harp if they are loose. With the tension off the strings, find a humidifier, and place it under the piano. Secure or weight down a block of wood about 12 inches square to the floor as a point of reference. If you have carpet, you need to weight the board down so that it cannot raise later. It you have a late era home with a hard surface floor, forget the block of wood and measure from the floor. You will now stack small blocks of wood and a wedge between the ribs of the sound board and the heavy structural wood beams below the sound board. Do this at every point where a rib and heavy wooden beam intersect. DO NOT DRIVE WEDGES BETWEEN THE LARGE WOOD MEMBERS AND the sound board itself. This could destroy the sound board. Only put wedges between the ribs and the beams. Do this wedge routine in a circle about midway between the edge of the sound board and the center of the sound board. Do not drive the wedges any tighter at this time. Get all the wedges snug in about a circle under the sound board, and take measurements. YOU MUST HAVE THE TWO MEASURING POINTS OF REFERENCE mentioned below. Measure VERY CAREFULLY the distance from the block of wood on the floor (or measure from the hard floor surface) to a point at the center of the sound board. Mark that point clearly. Tack a string to the extreme edges of the sound board, possibly on a rib, secured at both ends and crossing the center point you marked. This will be a second point of reference. Make sure the string is level with all the ribs across the sound board. Measure in 64ths of an inch from the string to your mark in the center of the sound board. Write down both reference measurements you now have. NOW YOU WILL RAISE THE SOUND BOARD. Tap in the wedges around the circle of wedge points over and over in stages and measure frequently until the center of the sound board is 1/2" raised higher than when you started. Measure over and over so that you raise the board evenly all around. Do this in several modest trips around the circle of wedges. Once you have the center of the sound board at 1/2" higher than when you started, you are ready to do the heat and humidity treatment. Secure a home humidifier and a space heater. Turn on the humidifier for three hours. ALSO, place a space heater under the piano on low, and cover the piano with a trap. You want the under area of the piano to get up to around 90 degrees F. So, set the space heater for this temperature, or use a thermometer to check it. This step will expand and bend the sound board upward. Wood is bent with moisture and heat. WARNING: This process could damage the outer cabinet of the piano if it is old and weak already. YOU decide if you want to take the risk. If you are not sure of yourself, you should have a new sound board installed. You now want to set the wood so it keeps its crown you have restored. LEAVE THE WEDGES IN PLACE SO THAT THE SOUND BOARD IS UNDER TENSION UPWARD. You are now going to dry the sound board out completely. Remove the humidifier and heater. Place a dehumidifier under the piano, and you now want to dry it WITH THE TENSION STILL ON THE BOARD. Dry it for 24 hours with only the dehumidifier-- NO HEATER. If you can set the humidity level on the dehumidifier, set it at the low setting so it will keep the humidity at 30% under the piano. Do this again with the tarp over the piano. After the 24 hours of drying, remove the dehumidifier and tarp, and remove wedges and blocks and see if the crown was restored by measuring again by both measuring options. What you see is what you get. If you did not gain much then your piano is not going to respond to this technique. I would not try a second treatment.
This is an act of desperation, but it is a secret used in many restoration shops. If you determine that you have added crown to the board, you may go on with restoration. Measure again after all the tension is back if you want to, but you may find that you have gained only a little crown, or you may find the restored crown has stayed well. If you have ANY crown, do not go back and do it again. One last suggestion. Do NOT be reluctant to call an older experienced piano technician and compare notes. This is a bit of a crazy sounding technique, and it is always good to listen to all the voices you can get to help.
ANOTHER TECHNIQUE FOR RESTORING CROWN With the strings and harp out of the piano, you can put tension upward on the sound board. Then make groves in the top of the board across the center and possibly to the right an left of the center IN THE SAME DIRECTION WITH the grain of the wood. Tap shims into the grooves with Elmer's Carpenter's Glue, which you can buy from us, and then tool off the wood of the shim sticking up with a plane or other wood working tool. The grooving tool and angled shims are available from us so that the groove is at the same angle of the shims. Once the tension is let off the underside of the sound board, a certain amount of crown will be restored as the shims prevent the board from returning to level. How much grooving, and how much tension on the underside of the board, is up to you. It is done in some restoration shops though.
BACK TO PIANO TITLE PAGE |
 57.
Piano Sound Board- Repairing Cracks
57.
Piano Sound Board- Repairing Cracks  There
is a myth still around that a piano is ruined if it has cracks in the sound board.
The Steinway people did a test on this. They made a piano with a quarter inch
"crack" in it. The cross ribs were tight and normal. When they tested it with
Db meters, they found that the piano with a "crack" in it did just as well as
a new piano with a perfect sound board.
There
is a myth still around that a piano is ruined if it has cracks in the sound board.
The Steinway people did a test on this. They made a piano with a quarter inch
"crack" in it. The cross ribs were tight and normal. When they tested it with
Db meters, they found that the piano with a "crack" in it did just as well as
a new piano with a perfect sound board.